
A simple, step-by-step guide for pharmaceutical quality teams — with a ready-to-use protocol format and a worked example.
If you work in a pharmaceutical, biotech, or medical device plant, you already know that clean equipment is not just about looks. It is a legal and safety requirement. Before any equipment is reused for the next product, a company must prove — with real data — that it is truly clean. This proof comes from a document called a cleaning validation protocol.
In this article, we will explain what a cleaning validation protocol is, why it matters, and how to write one in a simple, ready-to-use format. We will also walk through a full worked example, so you can see exactly how the numbers and steps come together in real life. By the end, you will have a clear template you can adapt for your own facility.
What Is a Cleaning Validation Protocol?
A cleaning validation protocol is a written plan that describes how a company will prove that its cleaning process removes product residue, cleaning agents, and microbial contamination from equipment to an acceptable level. It sets out what will be tested, how it will be tested, what results are acceptable, and who is responsible for each step.
Think of it like a recipe combined with a checklist. The recipe part tells you exactly how the cleaning and sampling will be done. The checklist part confirms that every step was actually completed and that the results meet the set limits.
Why Cleaning Validation Is Important
Cleaning validation is not just paperwork. It protects patients, protects the product, and keeps the company on the right side of the law. Here are the main reasons it matters:
- Patient safety: Leftover residue from one product can contaminate the next batch and harm patients.
- Regulatory requirement: Agencies like the US FDA, EMA, and WHO require documented proof of cleaning effectiveness.
- Product quality: Cross-contamination can change the strength, purity, or safety of a drug product.
- Audit readiness: A solid cleaning validation file is one of the first things auditors and inspectors ask for.
- Cost savings: Getting cleaning right the first time avoids batch rejection, recalls, and rework.
Regulatory Bodies That Require Cleaning Validation
Cleaning validation is expected by nearly every major health authority in the world. Some of the key guidance documents are listed below.
| Authority / Body | Guidance Document | Region |
| US FDA | Guide to Inspections of Validation of Cleaning Processes | United States |
| EMA | Guideline on Setting Health Based Exposure Limits | European Union |
| WHO | Annex 3, Technical Report Series 1019 – Cleaning Validation | Global |
| PIC/S | PI 006 – Recommendation on Validation Master Plan | Global (43+ countries) |
| ICH | Q7 – Good Manufacturing Practice for APIs | Global |
You can read the original documents here for reference:
- US FDA – Validation of Cleaning Processes
- WHO TRS 1019, Annex 3 – Cleaning Validation
- EMA – Guideline on Setting Health Based Exposure Limits
- PIC/S Guidance Documents
Types of Cleaning Methods Used in the Industry
Before writing a protocol, it helps to know which cleaning method your equipment uses. The method affects how the SOP is written and how sampling is planned.
| Method | Full Form | How It Works | Common Use |
| Manual Cleaning | — | An operator physically scrubs, wipes, or brushes the equipment using water and a cleaning agent | Small parts, punches, dies, hand tools |
| CIP | Clean-in-Place | Cleaning solution is pumped through the equipment automatically without dismantling it | Tanks, reactors, pipelines |
| COP | Clean-out-of-Place | Parts are removed from the line and cleaned separately, often in a wash bay or washer | Small removable parts, hoses, filters |
Manual cleaning generally needs more validation runs and tighter operator training records, because human technique can vary from person to person. CIP and COP are more repeatable since a machine controls the time, temperature, and pressure of cleaning.
Risk-Based and Bracketing Approach
Large plants may have dozens of products running on the same equipment train. Validating every single product combination would take too long and add little extra value. This is where a risk-based, or bracketing, approach helps.
- Grouping equipment: Equipment with the same design, material, and surface area can be grouped together, and only one representative unit is tested.
- Grouping products: Products with similar formulation and solubility can be grouped, and only the worst-case product from the group is tested.
- Risk assessment: A documented risk assessment (often a simple scoring table) is used to justify why certain products or equipment were chosen or excluded.
This bracketing approach is accepted by most regulators, as long as the justification is written down and based on real data — not just convenience.
Choosing the Right Cleaning Agent
The cleaning agent itself must also be considered in the protocol, since leftover detergent is just as much a contaminant as leftover product residue.
- Water for Injection (WFI) or Purified Water alone, for simple, water-soluble residues.
- Mild alkaline or acidic detergents, for tougher organic residues.
- Solvent-based cleaning agents, for oily or non-polar residues that water cannot remove.
- The final rinse should always use water of a quality equal to or better than what is used in the manufacturing process itself.
Whatever agent is chosen, its own residue limit should be added to the acceptance criteria, and a suitable test method (such as conductivity or TOC) should be used to confirm it has been rinsed away.
Cleaning Validation vs. Cleaning Verification
People often mix up these two terms. Here is a simple comparison to keep them straight:
| Point | Cleaning Validation | Cleaning Verification |
| What it is | A planned, documented study done multiple times to prove a cleaning method always works | A one-time check done after a single cleaning event |
| When used | For routine, repeated manufacturing processes | For new products, rare changeovers, or campaign-based production |
| Number of runs | Usually 3 consecutive successful runs | Usually 1 run per event |
| Documentation | Formal protocol and report | Simpler test record or checklist |
Cleaning Validation Protocol Format
A good cleaning validation protocol follows a fixed structure so that every reader — from operators to auditors — can find information quickly. Below is a standard format used across the pharmaceutical industry.
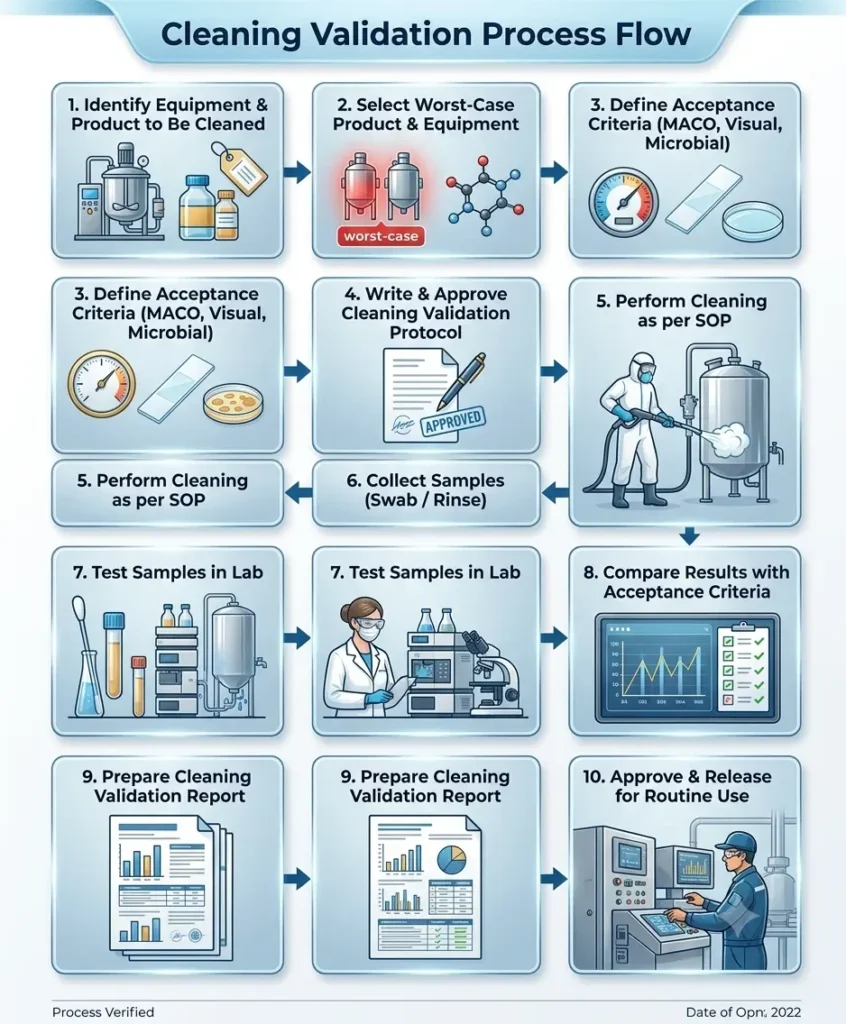
1. Protocol Approval Page
This page carries the protocol number, version, effective date, and signatures of the prepared by, reviewed by, and approved by personnel (usually from Production, Quality Assurance, and Quality Control).
2. Objective
A short paragraph stating the purpose of the protocol, for example: to demonstrate that the cleaning procedure for the tablet compression machine reduces residue of the previous product to a level that will not affect the safety, identity, strength, quality, or purity of the next product.
3. Scope
This section lists the equipment, product(s), and manufacturing area the protocol applies to. It also states what is excluded, if anything.
4. Responsibility
A table listing each department (Production, QA, QC, Engineering) and their specific duties, such as performing the cleaning, collecting samples, testing samples, and approving the final report.
5. Product and Equipment Details
Details of the equipment (name, ID number, material of construction, surface area) and the products that will be manufactured on it, including their batch size and daily dose.
6. Selection of Worst-Case Product
When one piece of equipment is used for several products, the protocol must justify which product is the hardest to clean or the most toxic. This is called the worst-case product, and it is the one actually tested.
7. Cleaning Procedure Reference
A reference to the approved Standard Operating Procedure (SOP) number used for the actual cleaning, so operators know exactly which steps to follow.
8. Sampling Plan
This section defines where samples will be taken (sampling points), how many samples, and which method will be used — swab, rinse, or both. A diagram of the equipment with marked sampling points is often attached.
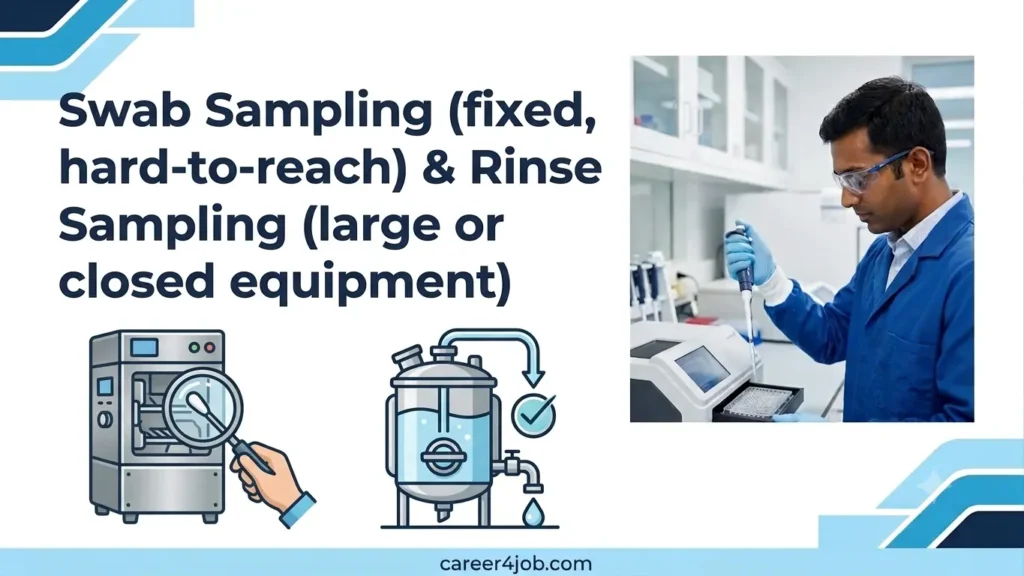
Figure 2: Swab sampling is used for fixed, hard-to-reach spots; rinse sampling is used for large or closed equipment.
9. Analytical Method
The validated test method used to detect residue, such as HPLC, TOC (Total Organic Carbon), or a simple visual check. The method’s detection limit must be lower than the acceptance limit.
10. Acceptance Criteria
The numeric or visual limits that decide pass or fail. This usually covers three areas: chemical residue limit (MACO), visual cleanliness, and microbial limit. We explain the MACO calculation in detail below.
11. Number of Validation Runs
Most companies run the cleaning process three times in a row and test each run. All three runs must pass for the equipment to be considered validated.
12. Deviation Handling
Instructions on what to do if a result does not meet the acceptance criteria — including investigation, root cause analysis, and re-cleaning steps.
13. Documentation and Attachments
Blank data sheets, sampling logs, and chain-of-custody forms that will be filled in during the actual execution.
14. References
A list of related SOPs, specifications, and regulatory guidelines used to build the protocol.
Worked Example: Cleaning Validation Protocol for a Tablet Compression Machine
To make this format easier to understand, let us walk through a simplified, realistic example. Imagine a plant that uses the same tablet compression machine to make two products: Product A (Paracetamol 500 mg) and Product B (Ibuprofen 400 mg).
Step 1: Identify the Worst-Case Product
The team compares both products based on toxicity (using the therapeutic dose), solubility, and how hard the residue is to clean. In this example, Ibuprofen is chosen as the worst case because it has a lower therapeutic dose and is harder to dissolve, making it more difficult to remove and more critical to control.
Step 2: Calculate the Acceptable Residue Limit (MACO)
MACO stands for Maximum Allowable Carryover. It tells you the highest amount of residue from Product B (Ibuprofen) that is allowed to carry over into Product A (Paracetamol) without posing a risk. One common formula is:
MACO (mg) = (MTD of previous product × Minimum batch size of next product) ÷ (Safety factor × Maximum daily dose of next product)
Using sample figures for our example:
| Parameter | Value |
| Minimum Therapeutic Dose (MTD) of Ibuprofen (previous product) | 200 mg |
| Minimum batch size of Paracetamol (next product) | 100,000 tablets |
| Safety factor (standard, per general practice) | 1000 |
| Maximum daily dose of Paracetamol (next product) | 3000 mg |
Putting these numbers into the formula:
MACO = (200 × 100,000) ÷ (1000 × 3000) = 6.67 mg
This means no more than 6.67 mg of Ibuprofen residue may be present in the entire shared equipment train before the next batch of Paracetamol is made. This total limit is then divided by the equipment’s total surface area to get a limit per swab area (usually per 25 cm² or 100 cm²), which becomes the number the lab actually checks against.
Step 3: Define the Sampling Plan
For this example, the team selects five sampling points on the compression machine: the die table, upper punch, lower punch, hopper, and dust collector. Swab sampling is chosen for the die table and punches because they have small, fixed, hard-to-reach areas. Rinse sampling is chosen for the hopper because it is large and awkward to swab evenly.
Step 4: Set the Acceptance Criteria
| Criteria Type | Limit Used in This Example |
| Chemical residue (per swab area) | Not more than 0.033 mg per 25 cm² (derived from MACO) |
| Visual cleanliness | No visible residue, film, discoloration, or foreign particles |
| Microbial limit (swab) | Not more than 25 CFU per 25 cm² |
| Rinse water TOC | Not more than 500 ppb |
Step 5: Execute and Record
The operator cleans the machine following the approved SOP. QA witnesses the process and records the start and end time, cleaning agent used, and rinse water quality. Once cleaning is complete, trained personnel collect swab and rinse samples from the defined points and send them to the lab under a chain-of-custody form.
Step 6: Test and Compare Results
The lab tests each sample and reports the residue level. Here is what the (simplified) results might look like for Run 1:
| Sampling Point | Method | Result | Limit | Pass/Fail |
| Die table | Swab | 0.011 mg/25 cm² | 0.033 mg/25 cm² | Pass |
| Upper punch | Swab | 0.014 mg/25 cm² | 0.033 mg/25 cm² | Pass |
| Lower punch | Swab | 0.019 mg/25 cm² | 0.033 mg/25 cm² | Pass |
| Hopper | Rinse | 310 ppb TOC | 500 ppb TOC | Pass |
| Dust collector | Swab | 0.021 mg/25 cm² | 0.033 mg/25 cm² | Pass |
Since every result is below its limit, Run 1 passes. This same cleaning and sampling process is repeated for Run 2 and Run 3. If all three runs pass, the cleaning method is considered validated for this equipment and product combination.
Step 7: Write the Final Report
The final report summarizes the objective, results of all three runs, any deviations and their resolution, and a conclusion stating whether the cleaning process is validated. Once QA approves this report, the equipment can be used for routine production with the validated cleaning SOP.
Dirty Hold Time and Clean Hold Time
Two related studies are often confused with cleaning validation itself, but both feed into it:
- Dirty Hold Time (DHT): The maximum time equipment can sit uncleaned after use, before cleaning becomes harder or microbial growth becomes a risk.
- Clean Hold Time (CHT): The maximum time cleaned equipment can be stored before use, before it needs to be cleaned again as a precaution.
Both time limits should be studied and written into the cleaning SOP, and the cleaning validation runs should reflect the worst-case (longest) hold times used in daily practice.
Documentation and Recordkeeping Best Practices
Good documentation is what turns a cleaning event into real evidence. Regulators pay close attention to how records are filled and stored, not just the final pass or fail result.
- Fill in data at the time the activity happens — never write results from memory later.
- Use permanent ink for paper records, and make sure every entry has a date and initials.
- If a mistake is made, draw a single line through it, write the correction beside it, and initial it. Never use correction fluid.
- Keep raw lab data (such as chromatograms) attached to the final report, not just the summary numbers.
- Store the approved protocol, raw data, and final report together so they can be pulled quickly during an inspection.
- If your site uses an electronic system, make sure it is validated and has a proper audit trail.
Common Mistakes to Avoid
- Choosing the wrong worst-case product without proper justification.
- Setting acceptance limits that are not linked to a scientific calculation like MACO.
- Using an analytical method that cannot detect residue below the acceptance limit.
- Skipping sampling point diagrams, which leads to inconsistent sampling between runs.
- Not repeating the cleaning process enough times to prove it is consistent.
- Poor recordkeeping, such as missing signatures or incomplete data sheets.
- Forgetting to revalidate cleaning after a change in product, equipment, or cleaning agent.
Tips for Writing a Strong Cleaning Validation Protocol
- Keep the language clear and specific — avoid vague terms like ‘clean enough’.
- Always base acceptance limits on a documented calculation, not a guess.
- Attach equipment diagrams with numbered sampling points.
- Get sign-off from Production, QA, and QC before starting execution.
- Keep a change log if the protocol is revised after issue.
- Store the final report where it is easy to find during an audit.
Equipment Design Considerations for Easy Cleaning
Cleaning validation becomes much easier when equipment is designed with cleaning in mind from the start. This idea is often called cleanability, and it is worth checking during equipment purchase or upgrade, not just after installation.
- Smooth, polished internal surfaces reduce the number of spots where residue can hide.
- Rounded corners and joints are easier to clean than sharp right angles.
- Fewer dead legs (unused pipe sections) mean fewer places for liquid to sit and residue to build up.
- Easy-to-remove parts allow for better manual cleaning and inspection.
- Drainable design ensures no cleaning solution or rinse water is left trapped inside.
If your equipment has design limitations, note them in the protocol’s risk assessment, and consider adding extra sampling points or a longer cleaning time to compensate.
Frequently Asked Questions (FAQs)
What is the difference between a cleaning validation protocol and a cleaning SOP?
A cleaning SOP tells operators how to clean the equipment. A cleaning validation protocol is the plan used to prove, with test data, that the SOP actually works.
How many runs are needed for cleaning validation?
Most companies use three consecutive successful runs, though this can vary based on internal quality policy and risk assessment.
What is MACO in cleaning validation?
MACO stands for Maximum Allowable Carryover. It is the highest amount of residue from one product that is allowed to remain and transfer into the next product without causing harm.
Is visual inspection enough for cleaning validation?
No. Visual inspection is one part of the acceptance criteria, but it must be combined with a chemical test (like MACO-based residue testing) and, where relevant, a microbial test.
How often should cleaning validation be repeated?
Cleaning validation should be reviewed periodically and repeated whenever there is a change in product, equipment, cleaning agent, or process, or as defined in the site’s revalidation policy.
What is the difference between swab and rinse sampling?
Swab sampling collects residue from a specific, defined surface area, and works well for fixed or hard-to-reach spots. Rinse sampling collects residue from a larger surface or a closed system by testing the final rinse water.
Who approves a cleaning validation protocol?
Typically, the protocol is prepared by Production or Validation team, reviewed by Quality Control, and approved by Quality Assurance before execution.
What happens if a cleaning validation run fails?
The failure is treated as a deviation. A root cause investigation is carried out, corrective action is taken (such as improving the cleaning SOP or training), and the run is repeated. The equipment cannot be used for production until a passing result is obtained.
Can cleaning validation data be reused for a new product added later?
Only if the new product fits within the existing worst-case justification. If the new product is more toxic, less soluble, or harder to clean than the current worst case, a fresh risk assessment and possibly new validation runs are needed.
Conclusion
A cleaning validation protocol may look like a long, formal document, but at its core it answers one simple question: can we prove, with real evidence, that our equipment is truly clean before the next product is made? Following a clear format — objective, scope, worst-case selection, sampling plan, acceptance criteria, and results — makes this proof easy to build, easy to review, and easy to defend during an audit.
Use the format and example in this article as a starting point, and adjust the details to match your own products, equipment, and internal quality policies. A well-written protocol not only satisfies regulators, it also gives your own team confidence that every batch starts on truly clean equipment.
External References
- US FDA – Guide to Inspections of Validation of Cleaning Processes
- WHO Technical Report Series 1019, Annex 3
- EMA Guideline on Health Based Exposure Limits
- PIC/S Publications
- ICH Q7 Guideline
Related articles
- Wet granulation process
- Fluid bed drying in pharma manufacturing
- Tablet compression machine
- GMP guidelines for pharmaceutical manufacturing
- Pharmaceutical equipment validation: IQ, OQ, and PQ validation.